This article shows two different techniques of how to do sheet swapping in Tableau. Sheet swapping is where sheets are hidden/displayed (swapped!) depending on user dashboard selections.
An article written in 2024 describes how to do sheet swapping using Dynamic Zone Visibility, which is my preference to swap sheets.
Later versions of Tableau (2019.2+) provide an additional way to swap sheets vs older versions of Tableau.
How do I swap sheets in Tableau?
This article will describe two different sheet swapping techniques.
- Sheet Swapping using a Show Hide Container button
- Sheet Swapping using a parameter and collapsing containers
This show and hide container setting only came into existence in 2019.2, so, if you’re using a version of Tableau prior to that, then scroll down to the Sheet Swapping with Parameter section.
Firstly I’ll run through the Show Hide Container button way to swap sheets. I prefer this as it’s visually better, however, it has limitations.

Sheet Swapping using the container Show/Hide Button
This technique works where there are only two different “toggle states” to manage.
A floating container is either displayed, with it’s contents, or it’s hidden – in which case the contents of the container below are visible instead.
For example, a user has to choose to see either the Bar Chart or the Table. They can’t see both together and have to see one of them.
For cases where the user has three or more options; for example to see either the Bar Chart, Table or the Line Graph; this technique doesn’t work.
Picking up from the great article by Ryan Sleeper, as already mentioned, this method works from Tableau 2019.2 and onwards. Here we utilise the Tableau container option to “Add Show/Hide Button” to (obviously) show or hide a container.
With the click of a button we can hide a container and it’s contents, and another click makes the container re-appear!
Effectively, it’s placing one set of toggle charts over the other, and hiding those charts in the container, showing those below.
Using this container option we are able to put some of the toggle items within a container and the other toggle items outside of the container. Similar to peek-a-boo for small children, the container, when visible, will cover the items below it while revealing it’s contents, and when hidden the items below are visible.
An example of sheet swapping using the show/hide button
A written description can be hard to understand so I’ll run through an example.
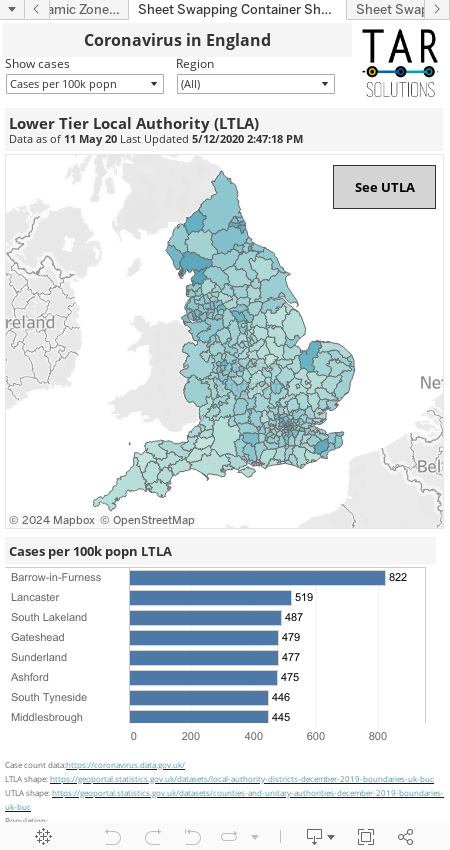
See this technique in action in the UK Property Affordability Calculator, where this technique shows or hides the information about the tool – see the information icon on the top right of the tool.
This technique is also in use in the post tracking coronavirus in England, where the user has the option to either view the data by UTLA or LTLA. These are different local authority levels in England.
First, create the worksheets with relevant charts, etc. Ryan’s example was a simple two worksheet toggle. This example is slightly more complex, there are 4 worksheets where 2 will always be visible.
This makes things more fiddly but nothing too painful.
The dashboard will mainly be floating, although the contents of the floating toggle container have to be tiled. The use of bold is quite deliberate as this is an important point; all of the elements which toggle have to be tiled within the floating container, they can’t be floating.
Float and tile the items into position
Firstly, position the elements which should always be visible on the dashboard. For example, dashboard headers and dashboard branding. Leave space for the toggle worksheets.
Note I have the dashboard Grid visible (Dashboard – Show Grid) to help with the floating position and size.
Float and position a container into the space for the toggle worksheets. This container should fill the entire space for the toggle items.

Also rename the container to Toggle Container – this makes it easier to find later.

For this sheet swapping technique to provide a seamless user experience, the items within the container must lie exactly on top of each other.
Therefore, we need to know the exact size and position of each element.
Floating elements enable exact positioning, we can type in the x and y coordinates and the size in pixels.
Tiled components are resized by dragging.
This makes setting exact sizes very fiddly and sometimes not possible. To drag something one pixel is far from easy!
Align the toggle items to the exact pixel
The LTLA map and bar chart will be in the container. Therefore do the following:
- position these tiled components within the container
- set the inner and outer padding for each component
- note the size and position for all items within the container
- fix the height of tiled components within the container (marked in red below)

Why fix the height?
Tiled components can resize depending on what appears within it. For example if a filter returns only one item in a bar chart, the container may (depending on the Fit settings) shrink. For sheet swapping using the technique, if the bar chart shrinks it will reveal the “hidden” bar chart below – which will be highly confusing for users.
Next add the UTLA map and bar chart. These have to fit exactly to the pixel on top of the LTLA map and bar chart.
Float the items on to the dashboard and set the position and size, exactly as the map and bar chart they are covering. The inner and outer padding also has to be identical.
Now the LTLA sheets, within the container, should be completely covered by the floating UTLA map and bar chart.
The container containing the tiled LTLA items should be sitting on top of the floating UTLA items.
Therefore we want to toggle the visibility of the container so when it is showing it covers the floating UTLA items. Simply alter the Floating Order and send the floating UTLA map and bar chart to the back.

Now our dashboard is set up. To finish, create a button for the user to control the container visibility with a click.
Activate the sheet swapping button
Use the Item Hierarchy to select the container. Then check the Add Show/Hide Button.

This is where naming the toggle container is useful – make sure the Toggle Container is the Dashboard Item to Show/Hide.
The button will appear somewhere on the dashboard with an X. Edit the button to make usable.
There are a number of options to customise the button. For this example I use a Text Button (instead of Image) and format it to my needs including setting the tooltip.

Size and position the button wherever you want it and that’s it, all finished! At the bottom of the article is an interactive version, or click to see the sheet swapping by hiding the container on Tableau Public.

Can’t find the Show Hide Container Button option?
If the Show Hide Button option isn’t there, check the container is floating. The Show Hide Button is only found on floating containers.
Swap sheets using a Parameter and collapsing containers
Sheet swapping with a parameter is a more traditional technique.
It gives flexibility, works in any version of Tableau likely to still be in use today (since the introduction of parameters), and allows more than 2 toggle options.
However, it also adds white space, hence my preference is to use the above solution, showing/hiding the container.
This technique to swap sheets uses a parameter as a selector, similar to allowing the user to choose their own charting measure.
Calculated fields use the parameter to drive the visibility and the collapsing and expanding of containers give the impression of sheet swapping.
An example of sheet swapping using collapsing containers
To build almost the same dashboard as above, assuming the worksheets are existing, start with creating a parameter and associated calculated fields to control visibility.
To begin create the parameter which the user will use to define what they want to see in the dashboard.

Next create the calculated fields to use the parameter. The calculated field controls whether there is any data to see in the map and bar chart worksheets.
We need two calculated fields, [isLTLA] and [isUTLA].
[isLTLA]: [Select UTLA or LTLA] = "LTLA"
[isUTLA]: [Select UTLA or LTLA] = "UTLA"
(In this example it would work with only 1 calculated field, we could create a simple boolean to toggle. However, to show how it would work for a tri-state or more toggle I have created a calculated field for each toggle option.)
We’ll use those calculations shortly, once the dashboard is closer to completion.
Build the dashboard using tiled containers
Now we can build the dashboard. With this “sheet swapping using a parameter” technique, tile the items within the tiled toggle containers. Floating the toggle items does not work.
We use containers embedded in containers for this solution.
When a container is empty it collapses; Tableau containers can resize dependent on the content
Use blanks to Help embed tableau containers within containers
Embedding containers within containers is one of those Tableau tasks that can be frustratingly fiddly. The least fiddly way I know to do this is to use blanks as placeholders/separators during the build process.
Another thing that can help simplify the process is to add a border to the containers. Select the container and set the border in the layout tab.
First drag in a Horizontal container which will hold all of the toggle containers. Within this horizontal container we are going to put two vertical containers; one for the UTLA charts and the other for the LTLA.
To prevent this from becoming too frustrating, instead of dropping the vertical containers into the horizontal container, drop two Blank components side by side. The blanks should be in the position of the vertical containers.
Next place one vertical container inside the horizontal container and to the left of the blanks. Put another vertical container between the two blanks. Keep the blanks on the dashboard, we’ll remove them once the containers are set up.

Put the UTLA worksheets in one of the containers and the LTLA worksheets in the other container. Align the items so they would appear in the same position when “swapped”.

For this method to work, hide the worksheet titles of those worksheets within the containers. The worksheets only collapse – i.e. “hide” – with the title hidden.
Next, delete the blanks. Once all of the swapping items are in place, the blank placeholders have served their purpose. (Note placeholders in this context differs from using placeholders to build tables in Tableau.)
Also show the parameter control [Select UTLA or LTLA].
Use the calculated fields to show and hide the worksheets
The final step is to add the calculated fields created earlier: [isLTLA] and [isUTLA]. These fields control the visibility.
Put the [isLTLA] field to the Filters shelf of both the LTLA map and bar chart and set the value to True.
Do the same with [isUTLA], put it on the Filters shelf of the UTLA worksheets, and set the value to True.
Now the sheet swapping should be working. Alter the parameter to test.
Finally, to finish, add the other items you want on to the dashboard.

Troubleshooting if the containers aren’t collapsing
If your containers aren’t collapsing as expected, check they haven’t inadvertently had the container width fixed. When a container has a fixed width or height it won’t collapse; the container will obviously always remain the same width.
The image below shows a container with a fixed width/height. Tableau sometimes automatically fixes the size of some components so useful to be aware of this.

See the embedded interactive dashboard below.
What are the pros and cons of sheet swapping with the parameter?
The pro is this method enables the toggling of 3+ different toggle states.
The downsides are:
- White space – the more containers, the more white space
- Missing worksheet titles
Download both sheet swapping examples
Download these sheet swapping examples directly from Tableau Public. Also the Tableau Public sheet swapping examples are embedded below.
Hi, I followed the steps for the second method, but my containers are not collapsing. I am working in version 2019.4. I have checked that I am not using a fixed view. Would you have any idea of why this is? Thank you!
This technique can be fiddly and frustrating! Make sure none of the worksheets have titles. Also make sure nothing is fixed in size. Also make sure the filter/parameter is working and one of the worksheets is completely blank, as expected. If still not working start building the dashboard again, using your existing worksheets of course, and step by step test it’s working as expected. Good luck!
The show/hide method works great for me but I can’t get more than two worksheet into a toggle container. Why is that?
I wasn’t aware of that limitation. Does it work to put another container into a toggle container? I haven’t tested that, it may not work, just thinking of options.
I did try putting a container within the toggle container, and it didn’t work for me. Also, I just noticed that you can’t see the tooltip info on the worksheet with that is on the bottom of the floating order. Any ideas of how I might fix this? Thanks!!
I tried putting another container in the toggle container, but it didn’t work for me.
Also, I just noticed that you can’t see the tooltip information on the worksheet that at the bottom of of the floating order. Any ideas on how to fix this? Thanks!!
Update to my last comment: the problem with the tooltip showing up only happened on one of my dashboards. It wasn’t a problem on the others. Any thoughts on what I might have done wrong on the one dashboard? I’ll keep looking into this.
The tooltip thing sounds strange – did you accidentally switch it off? Hope you managed to resolve the other issues.
Hi I have tried to follow the first method but when I click on the show/hide button that I create, nothing happens? can you please help? thanks!
This doesnt seem to work for me
I’d need to see it to troubleshoot. Feel free to email or put a mock up on Tableau public
Hey There
thank you for this.
I tried parameter swap, when there is only one worksheet in the vertical container then it collapses. If I place two worksheets in vertical container, then white space or vertical container is still tehre after swapping, any advice would be appreciated
I just found this page and I am able to get the first option to work, but when I click the button, the tables swap great, but the titles don’t I end up with the titles sitting on top of each other. Any ideas?
Do you have the titles in the relevant containers? The title that should “disappear” needs to be in the container that hides on click.
I know this post is 3 years old, but just wanted to say I really appreciate this solution. It’s super valuable to me and presents a beautiful solution to the client.
Thanks!