This post shows how to format time in Tableau. Similar to formatting a date, use a Custom Format to format a time.
The best approach to displaying the time depends on the data.
In this article, learn:
- How to display Minutes as Hours and Minutes
- How to format Seconds as Minutes and Seconds
- Use a Tableau function to convert to a datetime data type
If there’s a field showing the time in a text or numeric field – for example, it might contain 1400, 0945, etc – a DATEPARSE formula is a good option to convert to a datetime data type.
Perhaps the data has time components broken into separate fields – hours, minutes, etc. In which case, a MAKETIME function can convert them into a datetime data type. Given MAKETIME only works for Tableau Data Extracts, this option isn’t always available; DATEPARSE offers more flexibility.
Once your data is a datetime data type, you can use date formats to display as a time.
In other cases, there may be a field showing the number of minutes or seconds an event took. For example, maybe there is a Tableau DATEDIFF function calculating the minutes between a start and end time. In this case, the best solution is to convert to decimal and use a custom format.
Format your time data as a time
To format your datetime field as a time, right-click on the field and Format. Then you’re able to apply one of the default formats, or write a custom format.

These are the standard abbreviations to format time:
| Unit | Abbreviation |
| Hour | hh |
| Minute | nn (or mm sometimes works)* |
| Second | ss |
| AM / PM | AMPM |
These date parts set the display format on any datetime data type.
When the data isn’t in a datetime data type, it could be numeric – for example, perhaps your data represents 10 hours as 600 in a field showing minutes – the custom format can still work.
The key to formatting a numeric time is to have the time field in a decimal format.
To convert seconds to a decimal, divide it by 24 (for each hour), then divide by 60 (for each minute), then divide again by 60 (for each second).
To convert minutes to a decimal, divide by 24 (for each hour), then divide by 60 (for each minute).
Once your time field is decimal, use formatting to display with the different time units.
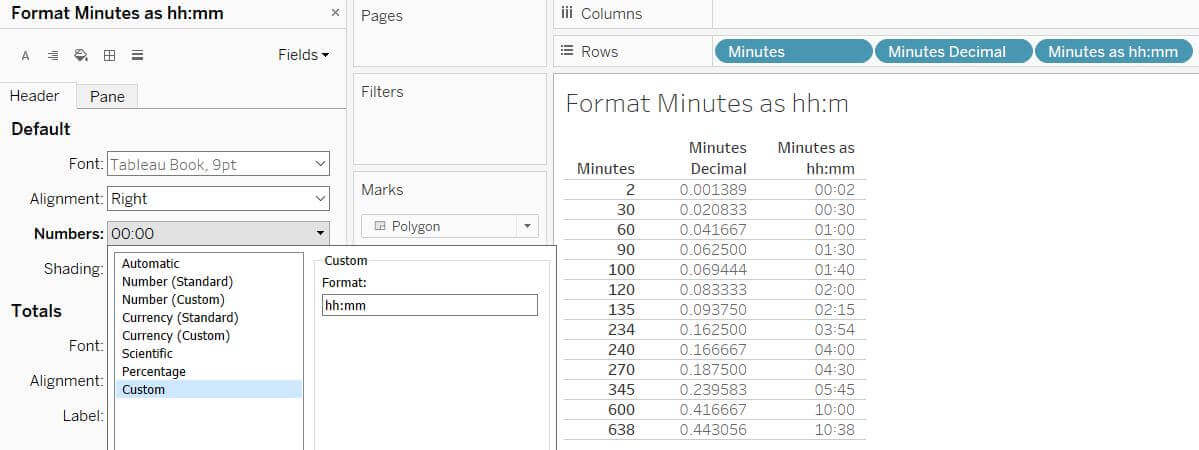
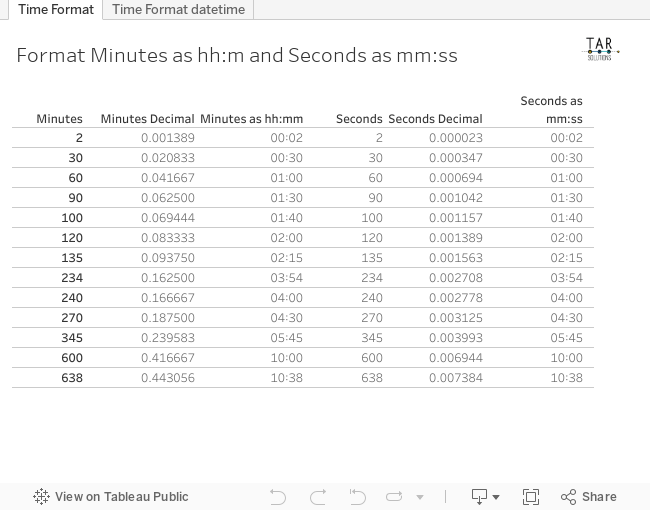
Format minutes as hours and minutes in Tableau
If your data has a field of minutes, and you want to format this as hours and minutes, start by converting to decimal.
Assuming the field is called [Minutes], this formula will convert it to decimal:
[Minutes]/24/60

To display the field as hours and minutes, format the calculated field using a custom format of hh:nn.
Use this technique to display data in 15 minute intervals (or other time periods).
Format Seconds as minutes and seconds in Tableau
If your data has a field of seconds, and you know the number of seconds will be below 3600 – i.e. one hour – then you may want to display this data as minutes and seconds.
Again, convert the field to decimal. Assuming the field is [Seconds], this formula will convert it:
[Seconds]/24/60/60

Format the field to display minutes and seconds. The custom format to display minutes and seconds in Tableau is nn:ss.
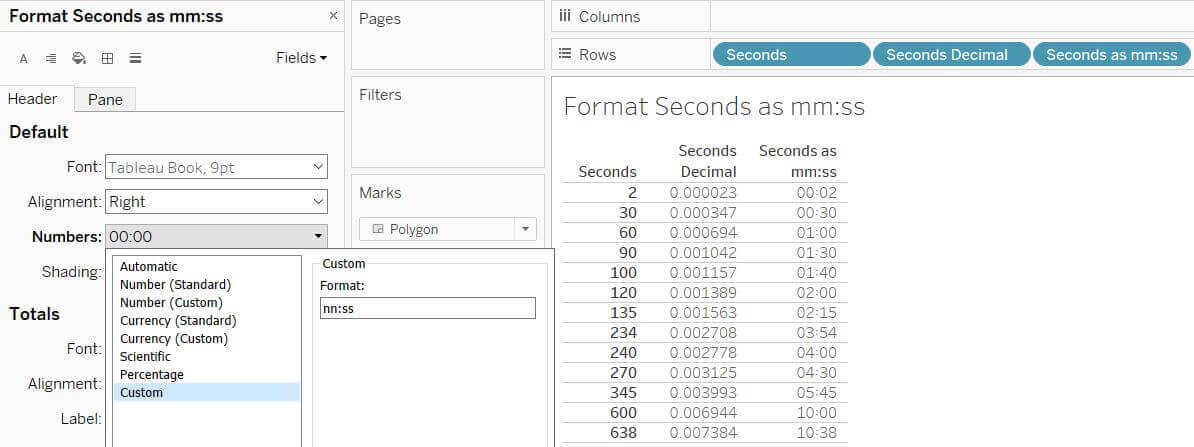
Notice I wrote “nn” and not “mm” for minutes. “mm” is also an abbreviation for months. For some reason, when “mm” is not alongside “hh”, Tableau recognises it as months.
Therefore, to display only minutes and seconds, refer to minutes using “nn”. Tableau recognises the “nn” as minutes.
Thanks to this video for providing this “nn” trick.
Tableau functions to create a time
If there’s a combination of time-based fields within the data source, it’s possible to build a time using these fields. In a calculated field, there are some formula options to create the time.
The MAKETIME function makes integers into a time. The DATEPARSE function can convert a string into a datetime data type.
The DATEPARSE function
This field takes a string, in a specific format, and converts it to a datetime data type.
Use this option if the time comes in a string format. This function works with most data sources, but not all.
The syntax of DATEPARSE is:
DATEPARSE(datetime format, string)
The DATEPARSE function doesn’t require a date; if a date isn’t provided, Tableau sets this to 1 Jan 1900.
For example, if there’s a field in the data source with hours and minutes combined – e.g. it has 2130 as one value in the field – convert that to a time with the following:
DATEPARSE("hhmm",[TimeFieldAsString])
“hhmm” is telling the DATEPARSE function the format of the datetime data, with the field name containing the data in the specified format.
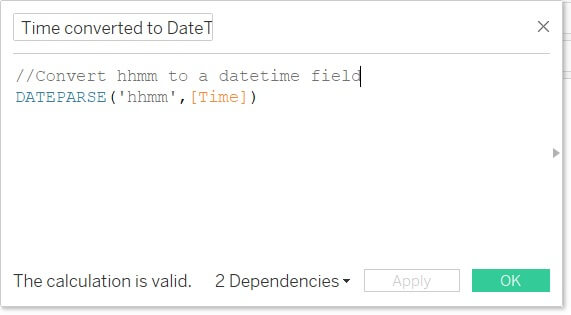
For the value 2130, the above DATEPARSE function will return 1 Jan 1900 21:30:00
Once Tableau recognises it as a datetime, use a custom format to only display the time component.
Use a custom format to display only the time component of this:

Format time as AM / PM in Tableau
To format time with AM PM, add AMPM to the end of the custom time format:
hh:nn AMPM
This format shows the time as a 12 hour time, with AM or PM appended at the end.
The 24 hour time format is hh:nn.
The MAKETIME function
As this function name suggests, it makes a time out of integers. This has limitations; it only works with data extracts. It won’t work with other data sources.
Use this when you have separate numeric fields for hours, minutes and seconds.
The syntax of MAKETIME is:
MAKETIME(hours, minutes, seconds)
The values of the time parts must be integers.
Therefore, to use the MAKETIME function, enter a value for Hours, Minutes and Seconds into the function.
For example:
MAKETIME(9,30,0)
Returns 9.30.00
These can be fields within the data source, or you can enter a constant. For example, if there’s an Hour and Minute field within the data, the following would combine those to return the time:
MAKETIME([Hours],[Minutes],0)
This sets the time to 0 seconds – i.e. the beginning of the minute.
Download Tableau Time Format Examples
I have put these simple examples into a Tableau Public workbook. Download it and see how it works; all quite simple once you know how!
What about AM and PM time?
Add AMPM to the end of the custom time format. For example, hh:nn AMPM.
The article is updated to reflect that missing format.
Because my time field is an average the format is hh:mm:ss even though it is displayed in this format the actual is hh:mm:ss.000. I need to round this or drop miliseconds. How can I round to hh:mm:ss so I can compare with another date field that is only hh:mm:ss.
Can you datetrunc to seconds?