A better understanding of the Tableau dates, date functions, and their usage will help you build more efficient dashboards.
There are many date functions in Tableau. Some manipulate dates, some convert data to dates, some identify if data is a date. This article will run through the main date functions and give some usage examples.
Better usage of date functions can improve your Tableau dashboard performance. I have often seen complex calculations building text strings for what should be date comparisons; these are very inefficient.
Contents
- Format a date
- Date properties
- ISDATE in Tableau
- Convert a string to a date in Tableau
- Remove the time from a date in Tableau
- DATEPART in Tableau
- DATENAME in Tableau
- DATEADD in Tableau
- DATEDIFF in Tableau
- DATETRUNC in Tableau
- Period on Period comparison examples
- Extract the time from a datetime
Do I need to use a Tableau date function?
Before getting into details about the Tableau Date Functions, firstly it’s good to know whether it’s necessary to use one. Obviously, this depends what you’re trying to do.
Sometimes simple formatting of your date field will suffice. For example, if you want an abbreviated date, such as MMM-YY – i.e. Jun 20; Dec 18, etc – formatting is the best way. There may be no need to use a calculation.
How to format a date in Tableau
Right click on any date field and set the format.
Clicking on the date field in the dimensions list allows setting of a default format.
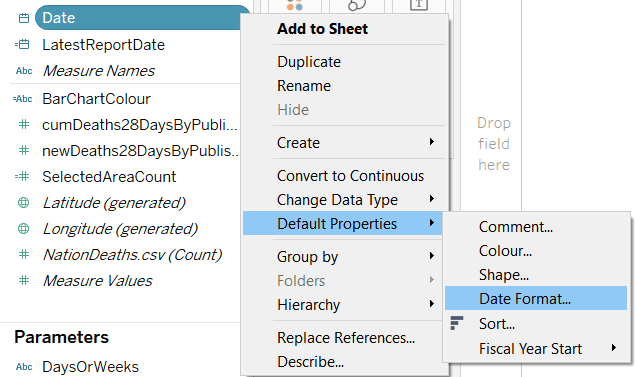
Once the default format is set, when that field is used with the “Exact Date – Discrete” setting, it will display the default format.

Right-clicking to format a pill within a view (i.e when on Rows/Columns/etc) will alter the format only for that specific pill in that specific location. This “overrides” the default format setting.
Tableau provide the full list of custom date format options.
A common date format is to abbreviate the month and year as MMM-YY. This is a custom format of mmm-yy.

Another common ask is to format as “day – short month – year”. This prevents confusion between the US mm/dd/yy and the dd/mm/yy used by most other countries.
To format to “day – abbreviated month – year” is a custom format of dd-MMM-yy.
Format a time in Tableau
To format into hours, minutes and seconds, use a custom format of hh:mm:ss.
For more complex time formatting questions, read the article explaining how to format time in Tableau.
Tableau Date Properties
Also, I must mention the Date Properties of your data source.
Right-click your data source and there’s an option Date Properties. Click this to set the following date properties:

All is not what it seems with those properties. Some of the date functions ignore them, especially when reporting fiscal date parts. For example, setting the Week start doesn’t affect the day of the week returned by the “weekday” date part.
Finding the latest date in the data source
To find the latest date in your Tableau data source is simple since the introduction of Level Of Detail functions. There are no date functions involved.
This formula will return the maximum date and is also usable in other calculations.
{MAX([OrderDate])}
All LOD calculations are wrapped in the curly brackets {}. Save this as a new calculated field and it’ll appear in the list of available Dimensions for use elsewhere.
Date Functions In Tableau Work on Date data types
To use a date function, the field entered into the function has to be a Date or DateTime data type.

Note the symbols. The calendar symbol next to your field tells you Tableau thinks it is a Date data type.
The clock on the calendar means Tableau thinks it’s a DateTime data type.
The Tableau ISDATE function – is my date field recognised as a date?
Depending on the data source, Tableau doesn’t always automatically recognise your data as a Tableau date. Sometimes you may have a mixture of data in a field, with some being valid dates and others not.
Date functions depend on Tableau recognising your date field as a Date data type.
To test which values are recognised by Tableau as being a valid date, use the ISDATE() function.
Add the field name to the function.
ISDATE([Field])
The function is boolean, it returns True for records identified as dates and False for those Tableau doesn’t think are dates.
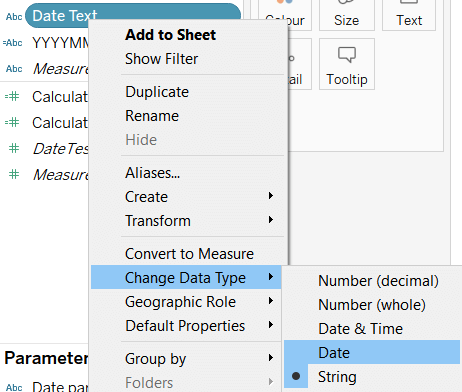
Convert to a Date data type
There are two ways to convert a field to a Date data type.
- Change the data type by right-clicking the field in the list of dimensions and Change Data Type. However, that doesn’t always work. Try it; if the field becomes a NULL then Tableau doesn’t recognise it as a date.
- Use a date conversion formula, such as DATEPARSE, DATE or MAKEDATE.
Converting to a date using a formula
If changing the data type of a field doesn’t work to convert to a date, then use a formula.
DATEPARSE converts a string to a datetime data type.
DATE() converts a string, date or integer to a Date data type
Use DATEPARSE to convert to a DateTime data type using a formula
The DATEPARSE function in Tableau converts a string to a datetime data type.
To use, enter the string format of the field surrounded by quotation marks, followed by the field name.
As always, an example is the simplest way to demonstrate.
In some systems the date exports as a long string containing various date parts. For this example assume the system produces the date in the format YYYYMMDD HHMM AM – with the AM at the end signifying the morning hours.
| Date Text |
| 20201103 1030 AM |
| 20200123 1030 AM |
| 20201103 1030 PM |
| 20201104 0810 PM |
In which case we can use DATEPARSE.
The DATEPARSE function expects two values; the date format and the string field to convert.
Therefore, to convert the above [Date Text] field, use the following formula:
DATEPARSE("YYYYMMDD hhmm aa",[Date Text])
Tableau have the full list of symbols for each date and time part on their site
One important thing to be aware of, the case sensitivity of “m”. Tableau recognises lower case mm as minutes. Upper case MM are months. Keep this in mind if trying to convert a date format of 20/07/2020 or 07/20/2020 (for those in the US) making sure to use the upper case MM.
DATEPARSE("dd/mm/yyyy","20/07/2020")
Becomes 20/01/2020 00:07:00 or 7am on 20 Jan 2020. For this date to convert correctly, capitalise the MM:
DATEPARSE( "dd/MM/yyyy","20/07/2020" )
Use DATE to convert to a date in Tableau
The DATE function offers an alternative way to convert a string to a date data type. The DATE function accepts strings, numbers and datetimes as inputs.
The function expects one input; which is the date as a string. For the example above we are interested in the date component, the first 8 digits.
The DATE function expects a valid date string as an input, for example:
DATE("year-month-day")
which means extracting the year, month and day from the field.
Therefore, the formula to convert this to a date is:
DATE(LEFT([Date Text],4)+"-"+MID([Date Text],5,2)+"-"+MID([Date Text],7,2))
MAKEDATE to convert to a date
MAKEDATE has some data source limitations, it works on Tableau data extracts but not on other sources. If using a data extract this is another option to convert to a date.
The inputs must be integers. The MAKEDATE syntax is:
MAKEDATE(year,month,day)
For example:
MAKEDATE(2020,11,15)
Returns 15 November 2020.
Common date conversion examples
Both date conversion Tableau functions, DATE and DATEPARSE, can solve some common date related challenges. These include:
- Convert YYYYMM to a date
- Convert a Week and Year to a date
- Remove the time from a Tableau datetime
Convert YYYYMM to a date
There are a number of ways to convert YYYYMM to a date. This article shows using the DATE and DATEPARSE functions.
Using DATE to convert YYYYMM to a date
If YYYYMM is a string:
DATE(LEFT([YYYYMM],4)+"-"+RIGHT([YYYYMM],2)+"-01")
If YYYYMM is a number the simplest option is to convert it to a string using the STR function. For example:
DATE(LEFT(STR([YYYYMM]),4)+"-"+RIGHT(STR([YYYYMM]),2)+"-01")
Using DATEPARSE to convert YYYYMM to a datetime
To use DATEPARSE the YYYYMM field has to be a string data type. Also, this returns a DateTime data type. The formula to convert to a DateTime is:
DATEPARSE("YYYYMM",[YYYYMM])
Convert a week number and year to a date
A great use case for DATEPARSE is converting a week number and year to an actual date. For example, the dataset may contain a field for the week number and a field for the year. But no date field, which makes trend reporting complicated.
Assuming the week number is in a field called [WeekNum] and the year in a field called [Year], the following formula will convert that to an actual date:
DATEPARSE("w-yyyy",STR([WeekNum])+"-"+STR([Year]))
To return the first day of the week use the DATETRUNC function:
DATETRUNC("week", DATEPARSE("w-yyyy",STR([WeekNum])+"-"+STR([Year])))
Remove the time from a Tableau DateTime
- Format the DateTime field to a format not showing the time
- Change the data type by right-clicking the field and Change Data Type
- Use the DATE function to remove the time component of a Tableau DateTime. This is the same as SQL Server, where the DATE function is also a good way to remove the time from a datetime in SQL. Simply wrap the DateTime field in the DATE() function and the time is gone:
DATE([DateTimeField])
Understanding Date Functions – How to refer to date parts in Tableau
To use Tableau date functions, it’s important to understand the syntax. The Tableau syntax doesn’t always match the syntax of all forms of SQL.
To manipulate date fields, first you need to know how to refer to the different date parts. Tableau include the below table on their site, showing how to refer to date parts.
| Category | Date Part | Date Part in Tableau |
| Time | Second | ‘second’ |
| Time | Minute | ‘minute’ |
| Time | Hour | ‘hour’ |
| Date | Day | ‘day’ |
| Date | Day of the week | ‘weekday’ |
| Date | Day of the year | ‘dayofyear’ |
| Date | Week | ‘week’ |
| Date | Month | ‘month’ |
| Date | Quarter | ‘quarter’ |
| Date | Year | ‘year’ |
| ISO | Day of week | ‘iso-weekday’ |
| ISO | Week | ‘iso-week’ |
| ISO | Quarter | ‘iso-quarter’ |
| ISO | Year | ‘iso-year’ |
For more information on ISO dates, wikipedia has a page on them. Week dates receive special attention on wikipedia, where they have their own page purely covering ISO week dates.
Using DATEPART in Tableau
The syntax of datepart is:
DATEPART(date_part,Date,[Start of week])
Start of week is to set the start day of the week. Values would be ‘sunday’, ‘monday’, etc. If this is left blank it picks up the default start of week from the data source – see the earlier Tableau Date Properties section.
An example, to return the quarter of OrderDate:
DATEPART('quarter',[OrderDate])
Datepart always returns an integer:
| Date Part in Tableau | Returns |
| ‘second’ | 0-59 |
| ‘minute’ | 0-59 |
| ‘hour’ | 0-23 |
| ‘day’ | 1-31 |
| ‘weekday’ | 1-7 |
| ‘dayofyear’ | 1-366 |
| ‘week’ | 1-53 |
| ‘month’ | 1-12 |
| ‘quarter’ | 1-4 |
| ‘year’ | e.g. 2020 |
| ‘iso-weekday’ | 1-7 |
| ‘iso-week’ | 1-53 |
| ‘iso-quarter’ | 1-4 |
| ‘iso-year’ | e.g. 2020 |
To return the month or weekday name there’s another function, DATENAME.
DATENAME in Tableau
The DATENAME function is similar to DATEPART. The only difference is that it returns a string instead of an integer.
DATENAME(date_part,Date,[Start of week])
This is clear for Months and Weekdays, where it returns the month or day name instead of a number. For example:
DATENAME('month',#1 Jan 2020#)
returns January
TODAY and NOW in Tableau
These functions are very similar. TODAY() returns the date today. NOW() returns the current date and time.
NOW() is the Tableau equivalent of the SQL GETDATE.
DAY, WEEK, MONTH, QUARTER and YEAR in Tableau
Instead of using DATEPART, some of the date parts have their own function. These functions provide a shortened way of writing DATEPART for some of the better used date parts.
The syntax is:
date_part(Date)
The following functions are shorter versions of writing DATEPART:
- DAY()
- WEEK()
- MONTH()
- QUARTER()
- YEAR()
This provides a simpler way of extracting those date parts. For example, to extract the year, it is quicker to write the YEAR function:
YEAR([OrderDate])
That’s the basics covered, now on to some of the date functions used to manipulate dates.
DATEADD in Tableau
DATEADD is used to add or take dates and time away from the date field. “Add” a negative number to take away.
The syntax is:
DATEADD(date_part,number,Date)
To get the same date last year then use DATEADD:
DATEADD('year',-1,[OrderDate])
How to use DATEADD
For example, if you only want sales from the last 3 months, then use DATEADD with an IF statement:
IF [OrderDate]>=DATEADD('month',-3,TODAY()) THEN [Sales] END
To add dates instead of taking away, simply remove the “-“ sign from the number.
DATEDIFF in Tableau
Another useful date function in Tableau is DATEDIFF. This calculates the difference between 2 dates in Tableau.
The syntax is identical to DATEADD, only this time it begins with DATEDIFF.
DATEDIFF(date_part,number,Date)
A common use is to compare the recency of the data against today’s date. Use the Latest Date formula described at the start of this article.
DATEDIFF('day',{MAX([OrderDate])},TODAY())
That formula will return the number of days between today and the latest order date in the data source.
DATETRUNC in Tableau
DATETRUNC is one of the lesser known Tableau date functions, but one that is useful. I use it a lot.
The syntax of DATETRUNC is similar to the other Tableau date functions, especially DATEPART.
DATETRUNC(date_part,Date)
For example:
DATETRUNC('month',[OrderDate])
DATETRUNC always returns a Date value.
What does DATETRUNC do?
In Tableau the DATETRUNC function converts all dates to the first date in your chosen period. That can be hard to understand, some examples will help.
Using the above example, with the Month date part, the function will set all Order Dates to the first of the order month. So, if the order happened on 22 Jul 2019, the above formula would change it to 1 Jul 2019 – i.e. the first of the month.
Using Thursday 22 Aug 2019 as the example date, these are the dates that DATETRUNC returns:
| Date | Date part | Return Date |
| 22 Aug 19 14:30 | hour | 22 Aug 19 14:00 |
| 22 Aug 19 14:30 | day | 22 Aug 19 00:00 |
| 22 Aug 19 14:30 | week | 19 Aug 19 00:00 |
| 22 Aug 19 14:30 | month | 01 Aug 19 00:00 |
| 22 Aug 19 14:30 | quarter | 01 Jul 19 00:00 |
| 22 Aug 19 14:30 | year | 01 Jan 19 00:00 |
Using date functions to answer common questions
Below covers a number of common requests, which date functions can help answer, especially around Period on Period comparisons.
This section provides calculated fields with date functions to answer:
- YoY change
- MoM change
- YTD YoY difference
- Extract the time from a datetime
- Remove milliseconds from a datetime
How to calculate Year on Year Change and Year on Year Difference
Perhaps one of the most common questions, there are a number of ways to calculate year on year change in Tableau, with date functions being one of those ways.
To calculate the change, isolate “This Year” and “Last Year” in separate calculated fields.
Year on Year change can mean a few different things, so, for simplicity, this example will compare the latest month in a data set with the same month from last year.
Note there is no mention of the actual month or year in the calculations; keeping it generic and anchored to a date within the data makes it future proof.
Identify the latest month
Earlier we looked at identifying the latest date in a dataset. Use that in combination with other date functions to find the latest month.
DATETRUNC('month',{MAX([OrderDate])})
This formula finds the latest date in the dataset, then sets that date to the first of the month.
The other side of the formula will also need a DATETRUNC; this will mean all records sharing the same month and year will share the same date.
For example, Sales in the latest month (call it Sales This Year):
IF DATETRUNC('month',[OrderDate]) = DATETRUNC('month',{MAX([OrderDate])}) THEN [Sales] END
Identify the same month last year
Similar to above, but this time also incorporate a DATEADD to find the same month last year.
DATEADD('year',-1,DATETRUNC('month',{MAX([OrderDate])}))
To find sales for the same month last year, adapt the formula for sales in the latest month (call it Sales Last Year):
IF DATETRUNC('month',[OrderDate]) = DATEADD('year',-1,DATETRUNC('month',{MAX([OrderDate])})) THEN [Sales] END
Note the order of the DATETRUNCs and DATEADDs in these formulas don’t really matter. DATEADD can be before or after DATETRUNC. Also DATETRUNC can be inside the MAX formula.
Both of the formulas, Sales This Year and Sales Last Year, should be their own calculated fields.
Now we have the fields to calculate the YoY change and YoY difference.
YoY Change
SUM([Sales This Year])/SUM([Sales Last Year])-1
YoY Difference
SUM([Sales This Year]) - SUM([Sales Last Year])
Calculate the Month on Month change
Almost identical to the above, only this time we alter the formula for Sales Last Year.
To isolate Last Month, alter the date part of this formula to take away a month instead of a year.
DATEADD('month',-1,DATETRUNC('month',{MAX([OrderDate])}))
Therefore Sales Last Month is;
IF DATETRUNC(,'month'[OrderDate]) = DATEADD('month',-1,DATETRUNC('month',{MAX([OrderDate])})) THEN [Sales] END
Therefore the MoM Change is:
SUM([Sales This Year])/SUM([Sales Last Month])-1
Year to Date Year on Year Difference
Another common request is comparing this year with last year, at the same point in the year. Basically a YTD YoY calculation. This is often used for tracking exactly where a business is at to date vs the same date last year.
To calculate the Sales YTD YoY we need:
- Sales to date this year
- Sales to the same date last year
Sales to date this year
To calculate sales to date this year I’ll assume the maximum date in the data set is the “to date” date.
{MAX([OrderDate])}
Using this, alongside other date functions, we can isolate all sales this year. If the latest date in the data set is the “to date” in “Year To Date”, as we’re assuming in this example, this formula isolates the Sales to date this year:
IF YEAR([OrderDate])=YEAR({MAX([OrderDate])}) THEN [Sales] END
This pulls all sales sharing the same year as the latest order date.
Sales to date last year
This is a little more tricky. This time we need to use DATEADD to identify the same date last year.
DATEADD('year',-1,{MAX([OrderDate])})
Using this to find the sales to date last year:
IF YEAR([OrderDate])=YEAR({MAX([OrderDate])})-1 AND [OrderDate]<= DATEADD('year',-1,{MAX([OrderDate])}) THEN [Sales] END
This time we find all last year sales (latest year – 1), discarding sales from any other years. Then, using the latest date minus 1 year, keep only dates that are less than or equal to that date. Therefore all dates last year that are later than our latest date are disregarded.
Calculate the YTD YoY Change
Very similar to earlier change and difference calculations, this assumes the above calculations are now separate calculated fields.
SUM([Sales To Date Current Year]) – SUM([Sales To Date Last Year])
There are other ways to do the same calculations
As with many things Tableau, there are multiple ways to do the same thing. Many of the above formulas can be written differently.
DATEDIFF can also serve as a good substitute for DATEADD.
Use whichever way works best for your data and what makes the most sense in your head.
How to extract the time from a Tableau datetime
To remove the date from a Tableau datetime, extracting the time component, relies on formatting. However, depending on what you want to do with the time component, using a calculated field can make this better.
Before explaining the calculated field usage, it’ll be necessary almost always to custom format the datetime field to a time.
Note, a Time datatype doesn’t exist in Tableau, it’s always a DateTime.
The simplest way to extract the time is to set a custom format of hh:mm:ss.

This only formats away the date component, it doesn’t remove the date completely. Remember, it’s not possible to remove the data completely as it’s a datetime data type.
This can cause a problem when sorting or charting as the sort happens using the date component, even if it’s not visible. To overcome this issue, set all of the dates to be the same.
Setting all of the dates to the 1 Jan 1900 will mean it does sort correctly by time.
To set all dates the same, use the DATEADD and DATEDIFF functions mentioned above. Firstly, use DATEDIFF to find the number of days from 1 Jan 1900 and the date in DateTime field. Then, using DATEADD, remove this number of days from the DateTime field.
DATEADD('day',DATEDIFF('day',[Date Time Field],#01 Jan 1900#),[Date Time Field])
The result of this field still has to be custom formatted, but it will sort correctly by the time.
How to Handle milliseconds in Tableau
There are 2 ways to handle milliseconds:
- Set the date format
- Use the DATETRUNC date function
Display milliseconds in Tableau
Which you use depends what you’re trying to do. If you want to display milliseconds – which by default tend to be hidden – set a custom date format. Adding 0 for each millisecond in the custom date format will display milliseconds.
For example, to show a full date and time including 3 decimal places of milliseconds, use this date format:
yyyy-MM-dd hh:mm:ss:000
Remove milliseconds from a date in Tableau
Sometimes a data source includes milliseconds but they aren’t wanted. For example, perhaps you want to count the occurrences of an event per second. If the data includes milliseconds, even if they’re not visible, the aggregation may not work as expected.
The way to resolve this and get rid of the milliseconds is by using DATETRUNC. A simple formula can round each datetime to the nearest second:
DATETRUNC('second',[DateTimeField])
Enable the user to choose the date Part
Using a parameter in combination with date functions enables the user to choose which date part displays on a dashboard. For example, the user may want to see either the latest day, latest month, latest quarter, etc, figures on their dashboard.
To allow the user to choose, create a string parameter with the date parts as the value. Note the lower case.

To use this as a latest period selector, create a calculated field referencing the [Date part selector] parameter.
This formula keeps only the latest period of the chosen date part:
DATETRUNC([Date part selector],[DateField])=DATETRUNC([Date part selector],{MAX([DateField])})
This is a Boolean calculated field, put it to the filter shelf and select True. When a user alters the parameter, the dashboard would also alter to only show data within that data part.
Wrapping Up
This article provides the information necessary to better understand the Tableau date functions and also demonstrates how to write more complex calculations to isolate different time periods.
IF case [Created Date] THEN ‘1’
ELSEIF [Completed Date] THEN ‘0’
END
How to execute this formula? I am getting a syntax error.
What is the formula intended to do?
Hey Andrew,
Any idea on how to choose different date format based on the Date selection?
Example, if I choose week, I want my date format to show as ISOWEEK (W23),
but if I choose Month, I want a different format to show, ie. 06 etc.
Presently, all date formats remain the same, regardless of choosing ‘year/month/etc’.
Are you using a parameter for the user to select the date part? Assuming yes, then create a separate field for each date part, and set the default format of that field, then (hopefully!), when you switch out the fields based on the parameter, the format will switch as well
Подскажите пожалуйста! Как можно разбить Week по периодам? Tableu показывает периоды по неделям согласно пн-пн (7 дней). Как я могу настроить так, чтобы в таблице отображалось например от четверга до четверга и так далее.
This is so informative. Thanks.
If I want to compare data but the data is a updated ar random dates how do I do that? Sometimes is updated twice a month and sometimes once every few months.
So I current have 01/07 , 15/07 and 01/08.
How I can compare 01/08 against 15/07 and 15/07 against 01/07 values.
I’m looking for. Fixed calculated field for a specific bar chart. Thank you
Are you always looking to compare the latest 2 values? It sounds like a scenario where using Index(), First() or Last() as a filter may work. Use one of those functions to number each date, with the latest date numbered first. This will likely mean altering the Compute Using values to get it right. Set up a simple table first, with your dates as 1 column and the function as the adjacent column to see how it lines up. If that doesn’t work, put some sample data on Tableau Public and I can take a look.